Wednesday, July 6, 2016

Upgrading to the new SharePoint Online

This article focuses on the coming upgrade experience for existing SharePoint Online customers. New customers will receive these features without any effort on their part.

What to expect during upgrade

  • Office 365 customers will be notified approximately four weeks prior to their upgrade and will have the opportunity to postpone for a minimum of two months.
  • Review What’s new in SharePoint Online-top 10 to start planning how your company will take advantage of the new SharePoint Online capabilities soon to be at your fingertips.
  • Evaluate whether content and sites are old or unused, and if so, consider removing content or even whole site collections that are no longer necessary.
You can learn about all the Office 365 service upgrade options at the broader Office 365 Service Upgrade Center, including what you need to know about Exchange Online, Lync Online and Office client.

Test, upgrade, enjoy

The new SharePoint Online experience awaits you. Please take time to review the available documentation and the suggested steps to ensure a seamless transition for your company. Make sure you build in the right amount of time to test the new capabilities and look and feel before committing to it.
You are more in control than ever during your upgrade experience. With a little effort, existing customers will be able to quickly determine the method that provides the right level of testing, allowing you to quickly move to the latest Office 365 has to offer. Let us know via the Office 365 Community forums how you are doing and what we can do to help.

Saturday, June 4, 2016

What’s new in SharePoint Server 2013 for IT professionals

In today’s volatile economic climate, organizations require collaboration, communication, and productivity solutions to be both cost-effective and flexible. SharePoint Server 2013 can help you achieve new levels of reliability and performance, delivering features and capabilities that simplify administration, protect communications and information, and empower users while meeting their demands for greater business mobility.
SharePoint Server is a preferred choice among organizations to enable rich, seamless, and productive collaboration. SharePoint Server 2013 builds on the investments of previous SharePoint releases to:
  • Lower IT costs with a flexible and scalable collaboration platform.
  • Better manage risk by safeguarding your business with secure and reliable capabilities.
  • Increase productivity through cost-effective and efficient management.

Improvements

Changing software can be difficult, SharePoint Server 2013 simplifies the process, empowers the user, and improves resiliency and manageability through new features and capabilities designed to balance the needs of users with those of IT.
What’s new in SharePoint Server 2013:
  • Improvements to Deferred Site Collection Upgrade
  • Site Collection Health Checks
  • Evaluation Site Collections

Deferred Site Collection Upgrade

A completely revised, backward-compatible experience is designed to balance the needs of users with those of IT. Because changing software is often challenging, SharePoint Server 2013 enables IT to upgrade SharePoint Server 2010 without having to upgrade users’ sites and content. These upgrades are deferred to the users, allowing them to choose when the time is right and new evaluation site collections allow users to request an evaluation of the update prior to changing production content. If they’re satisfied with the new experience, site collection administrators then can change their content to SharePoint Server 2013. It’s important to note that whether you have deployed SharePoint Server 2010 on-premises or subscribe to SharePoint Online in Office 365, the full upgrade capability is available.

Site collection health checks

Users have access to site collection health checks, which can be run prior to or during the site collection upgrade process to detect issues and provide solutions for resolving them. Guidance is available every step of the way to help to ensure a successful update. Even after changes are complete, site collection health checks remain available to help ensure the reliability and accessibility of site collections throughout their lifecycle.

Evaluation site collections

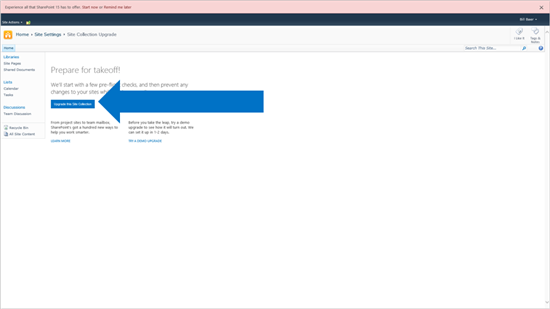
Site collection administrators can choose to perform an immediate upgrade through Site Settings or request an evaluation upgrade site collection.
SharePoint Server 2013 enables site collection administrators to request a preview of their site prior to committing their production site collection to upgrade. This enables the site collection administrator and users to validate the look, feel, and functionality of a site collection and establish a plan to address any issues without impacting their production content.
Evaluation site collections provide the same overall functionality that the production site collection on which it is based provides, including search, customizations, and any associated timer job definitions run on the web application or server farm.

System status notifications

System status notifications present important information about a SharePoint deployment and its availability, whether during upgrades, routine maintenance, or conversion to read-only. Users stay up to date on changes because they receive a prominent banner on their sites that provides insight into the activity being performed, which helps reduce calls to the help desk and subsequent burden on IT.

New and improved service applications

Machine Translation Service

SharePoint Server 2013 introduces several new service applications, including Machine Translation Service. Machine translation is the use of software to translate text from one natural language to another, substituting one word in one natural language to its corresponding word in another.

The service enables you to reach more people with new cloud-based translation services capable of translating not only sites, but also their content. These services have a comprehensive set of APIs, REST, and CSOM support, so content can be pre-translated when needed, or translated on the fly by users-asynchronously, synchronously, or streaming.

PowerPoint Automation Services

PowerPoint Automation Services is a new service application in SharePoint Server 2013 that provides automatic server-side conversion of PowerPoint Presentations from one format to another, for example, a PowerPoint Presentation in Open XML File Format (.pptx) can be converted into Portable Document Format (.pdf) for archival purposes, distribution to clients who do not have Microsoft PowerPoint installed, or to protect the presentation from editing.

PowerPoint Automation Services supports conversion of Open XML File Format (.pptx) and PowerPoint 97-2003 presentation format (.ppt) to .pptx, .pdf, .xps, .jpg, and .png.

User profile service

User profile properties drive a broad set of SharePoint features-from social collaboration to authorization. SharePoint Server 2013 simplifies access to user properties with new profile import options that range from a traditional Microsoft Forefront® Identity Manager-based approach, to new direct Active Directory® Domain Services synchronization, to choices for using an external identity manager. Overall, you should see significant improvements in performance while also having greater flexibility.

Work Management Service

Software should work together. With SharePoint Server 2013, you can gain a 360-degree view of workplace activities and improve communication across your organization through connected systems. A new Work Management Service provides support for action-based event aggregation across Microsoft server products, including Microsoft Exchange Server, Lync® Server, Project Server, and SharePoint Server 2013. For example, users can edit tasks from Microsoft Exchange Server on a mobile phone, and the Work Management Service aggregates tasks from Exchange Server in the My Tasks SharePoint list.

Office Web Apps

Office Web Apps has evolved into a separate server product, Office Web Apps Server, which can serve multiple SharePoint farms for viewing and editing documents. In addition, a server or farm that runs Office Web Apps can be used to view files that are stored across data stores, including the following:
  • Microsoft server products, especially SharePoint Server, Exchange Server, and Lync Server.
  • File servers (URL accessible).
Third parties also can integrate with the service and provide access to documents in their stores, such as EMC Documentum, IBM FileNet, OpenText, and Oracle.
By separating Office Web Apps from the SharePoint farm, administrators can update servers more frequently, if desired. Administrators in large organizations can manage the scale and performance of Office Web Apps independent of the SharePoint environment. They also can serve multiple SharePoint farms, as well as Exchange Server and Lync Server, from one Office Web Apps Server environment.

App Management Service

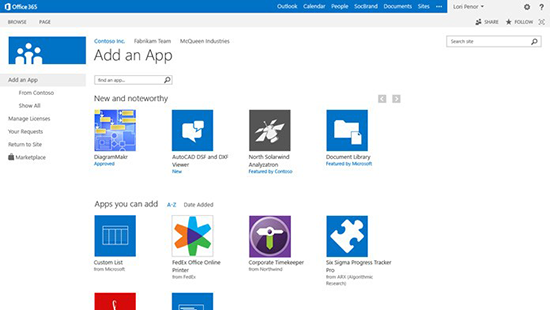
Applications are core to the SharePoint Server 2013 experience. A SharePoint application is a secure, focused solution that is easy to develop, deploy to a marketplace, monitor, and retire. Moreover, managing applications should be easy. SharePoint Server 2013 includes a new App Management Service designed to take the guesswork out of managing applications, permissions, and licensing, whether installed from the SharePoint Marketplace or Internal App Directory.
Rendering

Minimal Download Strategy

Minimal Download Strategy in SharePoint 2013 improves rendering performance when browsing content where large parts of the page do not change, which provides a more fluid navigation experience. For example, when navigating between a site’s home page and Shared Documents page, only the content that has changed between the source and destination page (controls and placeholders in the content area) are downloaded and the URL subsequently updated where the chrome is persisted.

In a typical AJAX scenario, controls interface with the server individually. Controls on the chrome in SharePoint are implemented with the URL at their core. Minimal Download Strategy implements a new download manager that interfaces between the client and server and retrieves the data as needed depending the initiating request. Each control on the page uses the download manager to update itself when necessary.

Operations and management

Windows PowerShell 3.0

SharePoint Server 2013 includes native support for Windows PowerShell 3.0 to help IT get more done in less time. Windows PowerShell 3.0 provides a comprehensive management platform for all aspects of the data center: servers, network, and storage. In this newest version of Windows PowerShell, sessions to remote servers are more resilient and can withstand various types of interruptions.
Learning Windows PowerShell is easier because of simplified, consistent syntax that resembles natural language. New Windows PowerShell commands are comprehensive and support the diverse tasks required at a data center, so IT professionals can automate basic and complex data center tasks with ease.

Distributed Cache Service

Data-driven applications have become increasingly prevalent as data is consumed from more diverse sources, such as business applications, syndicated feeds, and social contexts. SharePoint Server 2013 includes a new Distributed Cache Service built on the reliability of Windows Server® AppFabric® Caching. Distributed caching helps to ensure that no request takes too long.

Request Management

Request Management in SharePoint Server 2013 enables IT to prioritize and route incoming requests through a rules engine that applies logic to determine the nature of the request and the appropriate response. Request Management can be used to:
  • Route requests to servers with good health characteristics based on a new weighting schema.
  • Identify and block known bad requests such as web robot.
  • Prioritize requests by throttling lower priority requests to preserve resources for those of higher priority.
  • Route specific request types to other servers, either within or outside of the farm handling the request.

Storage and data platform

Shredded Storage

Shredded Storage is designed to reduce an organization’s storage footprint, minimize bandwidth, and improve performance through a new file save algorithm that ensures all write costs for file update operations are proportional to the size of the change being made to the file (and not the size of the file itself). Shredded Storage enables the storage of incremental updates to files in SharePoint Server by breaking a file into pieces and storing those pieces in Microsoft SQL Server®.

Disk I/O

With an increased need for larger quotas, storage costs remain a concern in many SharePoint environments, and there is generally very little room in IT budgets to multiply storage capacity by two, three, or even four times. In parallel, industry shifts and advancements have led to more high-capacity, low-cost commodity storage options. SharePoint Server 2013 can be deployed to a variety of storage architectures without sacrificing availability. Building on the performance improvements in SharePoint Server 2010, SharePoint Server 2013 delivers a significant reduction in disk input/output (I/O), lowering the bar for minimum disk performance. In addition, smoother I/O patterns reduce contention, making more storage options available to support a SharePoint Server 2013 infrastructure.

Resources

These improvements only scratch the surface of what’s new in SharePoint Server 2013 for IT Professionals.  Learn about more new features and capabilities through the resources below and let us know in the comments what your favorite new features of SharePoint are.

Wednesday, May 25, 2016

What’s new—Office 365

Office 365 Video provides you a single tool for uploading, sharing and playing back videos anywhere on your company intranet—whether you use SharePoint Online and/or SharePoint Server on-premises.
“It was difficult to find information in our original intranet. The Office 365 Video and Office Delve tools make it easy for our employees to reach into the firm and bring all our intellectual resources to bear on finding creative ways to solve problems. These tools are exactly what our employees are asking for.”
Deborah Youmans, senior manager of Collaboration Development at Booz Allen. See their full case study and video.
As you may have seen on the Office 365 Roadmap, we’ve been working hard to bring you numerous features and capabilities ranging from improving the upload experience, enhancing accessibility with closed-caption support, delivering analytics per video to provide aggregate trending patterns and more.
Watch the new Microsoft Mechanics video to see highlights of the new innovations—rolling out now.

Video viewer statistics

The new video viewer statistics gives people insights into how their videos are being viewed—highlighting viewing spikes where shared via email and Yammer or discovered within Office Delve. It shows aggregate data on how many people have watched your video and how long they spend watching it, visualizing the drop-off rates over time.
Office 365 Video March 1
Users can view interactive Viewer trends and Viewer engagement graphs from the Statistics drop-down menu underneath a video on its playback page.
Learn more about viewing statistics for a video in Office 365 Video.

Improved upload experience and capabilities

We are now rolling out an easier, more centralized way to upload videos. Start by clicking the universal Upload button in the top-left navigation and then selecting the desired channel for your video(s) from the list of channels you have upload rights to. Select or drag and drop videos to begin upload. During the upload, you will see an overall progress bar if you’re uploading multiple videos, plus individual progress bars per video. While this is happening, you can type the title and description details. Now that was easy and a time saver.
Office 365 Video March 2b
Easily upload videos, adjust and add title and description and see progress along the way.
Learn more about uploading videos into Office 365 Video.
Upload your own subtitle filesAfter the upload is complete, you can make your internal video communications more accessible. Office 365 Video supports the common webvtt format for subtitles, with the ability to have subtitles in multiple languages per video. You simply choose the language and upload the captions file. The Office 365 Video player then associates the captions when the viewer turns captioning on.
Office 365 Video March 3
Upload one or many webvtt caption format files to add closed captions to your videos.
Office 365 Video March 4
Viewers can then select their preferred language during playback from within the Office 365 Video player.
Learn more about adding subtitles or captions to a video.
Choose your own thumbnailOnce a video is in the system, you have the ability to choose the thumbnail. Options include selecting one of the four auto-generated thumbnails, uploading your own custom image or using the default thumbnail. The selected thumbnail image represents the video throughout Office 365including in the Office Delve activity feed, when embedded on a SharePoint team site (on-premises and online) or when placed within an internal blog post.
Office 365 Video March 5
Easily manage choosing your own thumbnail for video(s) you have uploaded.
Learn more about changing a thumbnail for a video.
Owner and people metadataBeyond title and description, Office 365 Video also shows who uploaded the video and the various people who are in the video. This enhances the discoverability of the video and highlights the main speakers; it, too, enhances when and how your videos appear in other users’ Delve activity feeds pivoting off of the relevant context of who knows who.
Office 365 Video March 6
You add people involved by doing a simple name lookup based on your active directory.
Easily insert a video into a SharePoint page or team siteWe want to save you clicks when you choose to broaden your video communications throughout your intranet. So, now it is easier than ever to embed a video—managed from within Office 365 Video—into a SharePoint Online page or team site. There is now an Office 365 Video button on the Insert ribbon tab to display a dialog box where you can quickly search for and select a video from your Office 365 Video portal.
Office 365 Video March 7b
Click the Office 365 Video button from the Insert ribbon menu when editing a SharePoint Online team site.
Read more about the value of embedding video throughout your intranet. And then learn more about how to embed a video into a SharePoint team site from Office 365 Video.

New admin controls and management capabilities

Download for offline viewingStay informed and up to date even when you are not connected to the Internet. Office 365 Video enables the ability to download the file to your local machine or easily transfer to your smaller device for times when you need to view a video offline or to show a video in a location without Internet access. Channel admins can control who is able to download videos based on the same permissions for the channels (owners, editors and viewers).
Office 365 Video March 8
Once enabled, viewers can take a copy of the video for offline playback by clicking the Download button directly under the player on the player page.
Learn more about how to set download permissions within the channel permissions settings.
Yammer settings per channelVideo channel owners in organizations that have Yammer enabled can now control the default Yammer group that video comments are posted to or disable Yammer comments altogether for a channel.
Office 365 Video March 9
The new Yammer control tab, within Channel Settings, gives channel owners flexibility to turn Yammer conversations on or off or to have comments posted to a specific Yammer group.
Learn more how to manage and control Yammer settings per channel.
Restore a video in the Recycle BinAdmins can now restore videos that have been deleted by a user. Deleted videos sit in the Recycle Bin for 90 days, and it is now possible to recover and restore videos from the Recycle Bin. To restore a video in the Recycle Bin, simply select the video and click Recover Selection. The video is resubmitted into the system and prepped for playback.
Learn more about deleting and restoring videos from the video Recycle Bin.
Office 365 Video now deployed in U.S. Government zone (GCC) and China datacentersCustomers whose tenants are in the Government Community Cloud (GCC) and China datacenters now have Office 365 Video available to them for their dynamic, secure and private internal communications.

Monday, April 4, 2016

SharePoint Department Site template… doesn’t exist

Why you should never create SharePoint Department Site template

The objective of creating project site templates is pretty obvious. You are running a number of projects in your organization and want all you project or team sites to look the same, have standard way of organizing documents and other content. In other words, you want to enforce certain project management methodology and business processes.
With departments sites, it is a different story. I frequently get requests from clients to help create Department site templates and my response is always “it does not exist“. Here is why. I yet have to see 2 departments in one organization that will organize documents and other content in exactly same way. For example, it is very unlikely that your Marketing team will organize documents same way as an Accounting team. One might use folders, another metadata and metadata will most likely be different anyway.
So while some basic elements like branding, calendars, contact lists might be the same, for the most part, various Department sites will look and work differently. And will be used by different sets of employees.
Enforcing a single template on all departments is a sure way to kill SharePoint User Adoption. Make sure to empower your employees and address their unique needs by customizing their department sites according to their requirements and business processes.

Friday, March 11, 2016

SharePoint is a Religion!

Now that we just completed another series of winter holidays, Hanukkah and Christmas, I realized something. SharePoint is a Religion! And we are all part of it! If you don’t understand what I mean, let me explain…

Why is SharePoint a Religion?

SharePoint has a large following

Just like any major religion – it has a large following. There are many people in the world that practice the religion of SharePoint. That’s because SharePoint has been for a while now (almost 15 years), and is present in many large and medium corporations. And thanks to Office 365, SharePoint is now widely used by small organizations and non-profits.

SharePoint has religious fanatics

Just like any religion, SharePoint has some hard-core fanatics. I am one of them. There are many others too. We, SharePoint fanatics, think that every single problem in the world can be solved by SharePoint. We live and breathe by SharePoint and get excited by its little and unique features and unlimited capabilities. Every other word that comes out our mouth is “SharePoint”.

SharePoint has a holy day – Saturday

Every religion has its holy days. Just like Sabbath (Saturday) is a holy day for Judaism, Saturday happens to be the holy day for SharePoint as well. That’s the day when SharePoint Saturdays occur. This is when SharePoint followers and fanatics congregate in the cities they live in and listen to sermons from each other about SharePoint. It is a whole day event that takes place almost every Saturday it some major city in the world and repeats annually.

SharePoint has God

Just like any other monotheistic religion, SharePoint has one God as well – it is called Microsoft. SharePoint is a Microsoft’s product. And Microsoft is in total control of SharePoint, its features, look and feel, updates, etc. So all of us, SharePoint followers, we all look up to Microsoft and carefully listen to it and try to understand and interpret every little word or piece of news that comes out. And then we all get excited about it and talk forever about it

SharePoint is everywhere

Just like you find places of worship everywhere – SharePoint is everywhere too. Thanks for Office 365 (cloud) – SharePoint is everywhere. It is tied to Outlook when you send an email, it is on your mobile device, it is there when you store your documents using OneDrive or collaborate with colleagues at work.

Sunday, February 14, 2016

Microsoft PowerApps for No-Code Apps


Microsoft’s new PowerApps just came out this week! PowerApps is an app for Windows 8 and up desktops, or mobile devices. It is also only for Office 365 customers. When you go to http://www.powerapps.com, you can request an invite, so that your Office 365 tenant will be allowed to use it. Here is the link to install it http://aka.ms/powerappsinstall This is a preview of the product, so things in these screenshots may change over time before the final release.
There are several links on the homepage to get you started, such as Plans and Resources. Also, as you’re trying out PowerApps, there is a little smiley icon at the top right. That’s where you give your feedback. Please let them know what you thing, and constructive criticism letting them know specifically what you are referring to.
Once you get logged in for the first time, the web page will look like this. You can immediately start making an app or a logic flow:
120215_1817_MicrosoftPo1
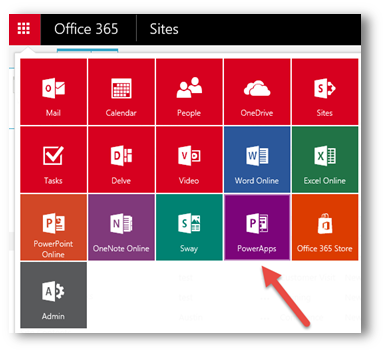
(To get back to PowerApps, it will also be available here):
120215_1817_MicrosoftPo2
You may assume that you’d need an app before creating a logic flow. Not really. Logic flows can be based off of a lot of different types of data sources that you may have access to, such as Salesforce or Azure. I love the web page ifttt.com, which lets me automate a lot of things in my life. Well, this is similar, except more for business data sources.
In this example, I’ll start making a SharePoint app based on a couple of lists.
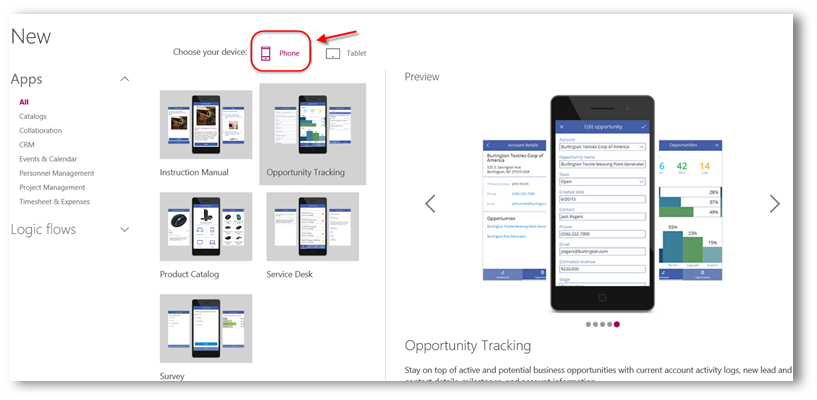
Under “Make an app”, when you click Get Started, it shows you a lot of example apps to try out. I highly recommend creating one or two of these, even if they don’t have the data source you need, just to try them out and see how all of the controls work, and how they are set up. Notice at the top, that you can flip between a Phone or a Tablet, and the app templates will look different for each.
Phone:
120215_1817_MicrosoftPo3
Tablet:
120215_1817_MicrosoftPo4
When you click the Choose button at the bottom right, it opens up PowerApps on your computer, or prompts you to install it.
For the sample data in the examples, for now it only lets you choose between Dropbox, OneDrive or Google Drive. As you can see, I selected Dropbox.
120215_1817_MicrosoftPo5
In PowerApps, click Connections on the right side, so that you can create one or more connections to your data. You’ll notice in the pricing plans that the number and type of connections will be different in different plans. For example, the enterprise level will even let you connect to on-premises data sources. As of now, the available connections you can create are:
  • Dropbox
  • Dynamics CRM Online
  • Google Drive
  • Microsoft Translator
  • Office 365 Outlook
  • Office 365 Users
  • OneDrive
  • Salesforce
  • SharePoint Online
  • Twitter
You can just create some connections, which you will potentially use in various apps you create. You don’t have to use every data connection in every app, but PowerApps will remember all of your connections and they will stay in there for next time you fire it up to create another app. I’m not going to create the sample app right now, I’m going to do a SharePoint Online one, so I went ahead and added a connection and authenticated to my Office 365 tenant. Here is their set of steps for creating connections.
  1. For my SharePoint app, on the main screen I’m going to choose Start from your data, as a phone app:
    120215_1817_MicrosoftPo6
  2. I choose SharePoint Online from my list of connections, then on the right, I can add my SharePoint site using New Site. I can have multiple sites in this list.
    120215_1817_MicrosoftPo7
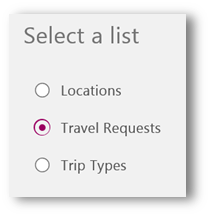
  3. I selected my travel site, which doesn’t have that many lists in it. Once you select a site and click Connect, you will be prompted to select a list. Don’t worry, even though you’re only selecting one here, you’ll be able to add more to your app. Select a list and click Connect.
    120215_1817_MicrosoftPo8
  4. Your app is built. Pretty basic and needs some tweaking, but it totally works!
    120215_1817_MicrosoftPo9
Let’s walk around and see what’s what. Here’s Microsoft’s set of instructions, and you can scroll down to the Customize the app section.
https://powerapps.microsoft.com/en-us/tutorials/get-started-create-from-data/

Getting in and Out

First of all, if you create this app and then exit PowerApps and come back, you’ll see list of all of your apps that you can open. Like me, you may click the name of the app to open it to design it some more. BUT, when you click the name of the app, that is the end user experience of interacting with it, filling out forms, etc.
Design: You need to click the little “Edit” icon (pencil) to get back to the designer.
Sharing: That’s how you “Publish” it (for now), you share it with people using their email addresses.
Pin: Pin this PowerApp to your Start screen. For people who use it, fill out forms, etc on a daily basis, this is what they would do. Currently there is no out-of-box direct link from your SharePoint site to your app.
120215_1817_MicrosoftPo10

Screens

The concept of Screens in here is similar to Views in InfoPath or Forms in MS Access. Same set of data, just different ways of looking at it or interacting with it. The default screens are down the left, and there are three. Notice in the ribbon in the screenshot above, you can create new screens, rename existing ones, and even select from pretty layouts for them.
BrowseScreen1 – This is the screen that shows you a list of stuff. Each item has a button to go to the detail page.
DetailScreen1 – This is like the DisplayForm in SharePoint. It’s for looking at data, like a list item.
EditScreen1 – This is used for new items being filled out OR for existing items being edited.
Just like with views in InfoPath, you can create buttons that will let you switch between views. For example, by default when you create a new item in here, it takes the user to the DetailScreen to view the item they just created. You can even click the little ellipses button next to any screen to do additional actions such as delete it or duplicate it.

Quick Tools

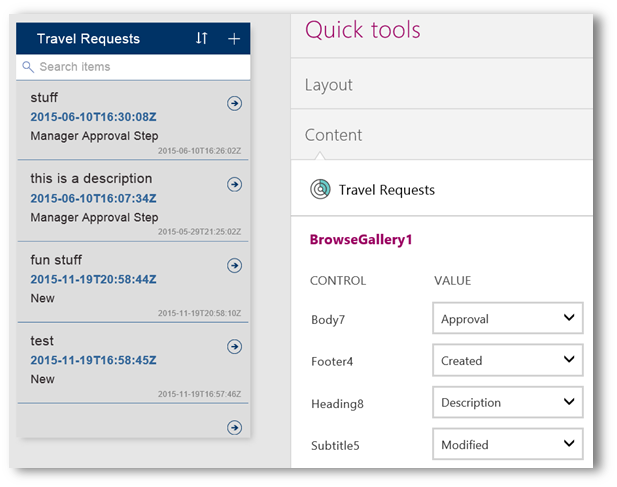
Notice the pane on the right in my screenshot above. If you don’t see it, click the Quick Tools button at the bottom of the screen. I love the way that you can quickly change the layout on your screens, pick from some color themes, or pick from your content fields. Layouts and themes are pretty self-explanatory, but what’s “Content” for?
120215_1817_MicrosoftPo11
I can tell by looking at the data that those aren’t the fields that I’d like to display here. For example, the one that says “stuff” is actually in the description of a travel request. I see on the right that Heading8 is bound to the description. To change it, I just change the drop-down box to Title. You’ll notice when you click one of those drop-downs for the values, that you see the system name for each field, not the pretty display name.
(Note: In list settings in the browser, look at the hyperlink of a SharePoint list column name to see Field= to find out what that column’s system name is)
I went ahead and switched some of mine around, so that the fields that I want are showing, instead of the defaults.
120215_1817_MicrosoftPo12

Options

There is an Options button at the bottom, next to the Quick Tools button. This has my data sources in it, and I can insert more data. For example, I’d like to have multiple SharePoint lists in this app, for lookups and such.
120215_1817_MicrosoftPo13

Adding more data sources

I’m not sure what the TextualGallerySample is, but there’s my Travel Requests list.
  1. Click Insert your data to add more sources, such as other SharePoint lists, Twitter, OneDrive, Azure, whatever I need.
  2. Click SharePoint Online.
  3. Click the name of your site, or you can even add other sites in here, so you can have cross-site data!
    120215_1817_MicrosoftPo14
  4. Click the name of one or more lists, and click the Insert button.

Controls

There are many really cool, modern types of controls that you can use in PowerApps. Here’s a page where they walk you through adding and setting up several. https://powerapps.microsoft.com/en-us/tutorials/add-list-box-drop-down-list-radio-button/
Data Cards – These are little sections in your form. Click on your default EditScreen1, and click on a control. The card I selected here is for the Title field, which I call the “Destination” in my travel request list. It contains the label and the text box for the destination.
120215_1817_MicrosoftPo15
When I open up Quick Tools again while this control is selected, it looks a little different. There’s more that I can do. Notice the little Edit column on the far right. See that my estimated cost field has a number icon, that’s because it’s a number field and the rest are text. I’d like my trip start and trip end fields to be date pickers instead of textboxes. This is what you will see when you click the little abc icon:
120215_1817_MicrosoftPo16

Advanced Settings

Also, notice that when you’re working in controls, there is a drop-down box and function button at the top of the screen. This can be used with screens, controls, buttons, etc, and this is where all of the logic happens. Also, there is an advanced view of properties.
On the View tab in the ribbon, click Advanced.
120215_1817_MicrosoftPo17
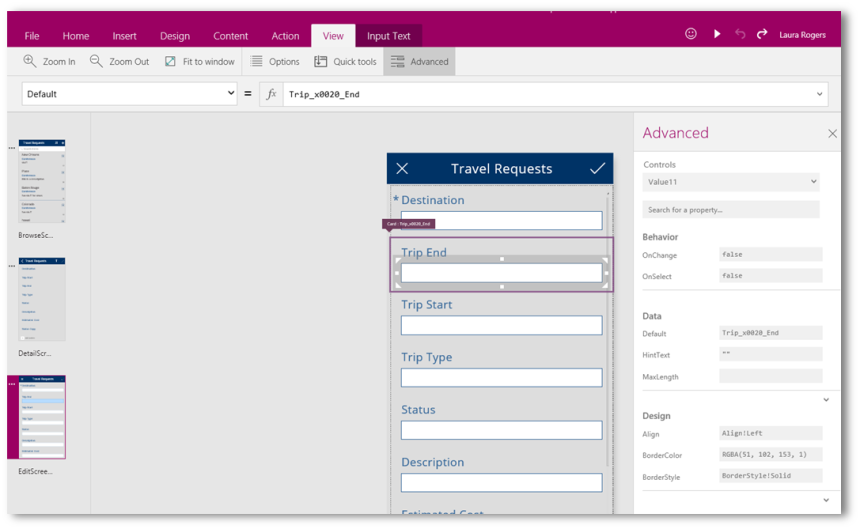
This is where it gets to be more like a programmer’s tool, but a power user can still make their way around a bit. I can click the dropdown at the top that says Default, and each of the properties that have values will show in bold. Then, I can use the fx (function) button to do more advanced functions. Notice in the Advanced pane on the right, a lot of the properties are listed there. See that I have my Trip End control selected, and the Default property says Trip_x0020_End, and you can also see the property and some others on the right. You’ll notice that when you let PowerApps generate your app for you from your data, and when you use any of the default templates, a lot of that logic is already there. For example, when I click the little checkbox (submit) button control, I can see that the OnSelect has a long string as the function:
If(editGallery1!Valid, UpdateContext({EditRecord1: Patch(‘Travel Requests’, EditRecord1, editGallery1!Updates)}); If(IsEmpty(Errors(‘Travel Requests’, EditRecord1)), Navigate(DetailScreen1, ScreenTransition!None, {BrowseRecord1: EditRecord1})))
As you start filling in or typing a function, it does prompt you and help you out as you go, letting you know what it’s expecting, to an extent. Here’s their formula reference: https://powerapps.microsoft.com/en-us/tutorials/formula-reference/

Using the App

At any time, you can use the Share button that I mentioned at the beginning of this post, to share and let other people use this app. There are even iPad and Android apps that they can use!
Well that’s all for now. This was just a preliminary run-through to get you started and familiarized with some of this.

Sunday, January 3, 2016

Step-by-step instructions on how to add such filter to your document library, improve user satisfaction and user adoption and spice up your search.

What is Metadata Navigation?

Before we proceed, I want to mention that this filtering mechanism (official name in SharePoint for this is Metadata Navigation) really only makes sense if you configure your library with custom metadata/columns. If you don’t have custom metadata setup, the only filters you will have are the ones that exist by default in any library (Modified, Modified By, etc.).
Metadata Navigation is a feature in SharePoint that allows users to dynamically filter and find content in SharePoint lists and document libraries.

Step 1. Configure your metadata, upload documents

I will assume that you already know how to do this. If you don’t – you might want to check out this slide deck for step-by-step instructions.

Step 2: Activate Metadata Navigation feature

Not sure why it is setup that way, but the cool looking filter (also known as Metadata Navigation) is not something that is activated out of the box. You have to enable the feature at the site level first. For this, you need to be a Site Admin (or have Full Control permission to the site).
  1. Go to Site Settings > Manage Site Features.
  2. Scroll down to Metadata Navigation and Filtering and click Activate button.
1

Step 3: Configure Metadata Navigation Settings

Once the Metadata Navigation is activated, you can now setup filters at the library level
  1. Go to the library where you want to add the filters
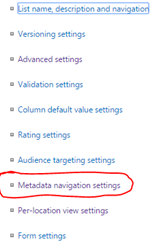
  2. Go to Library Settings tab – you will now see an option called Metadata Navigation settings. That option did not exist previously (it only appears after you activate that Metadata Navigation feature above)2
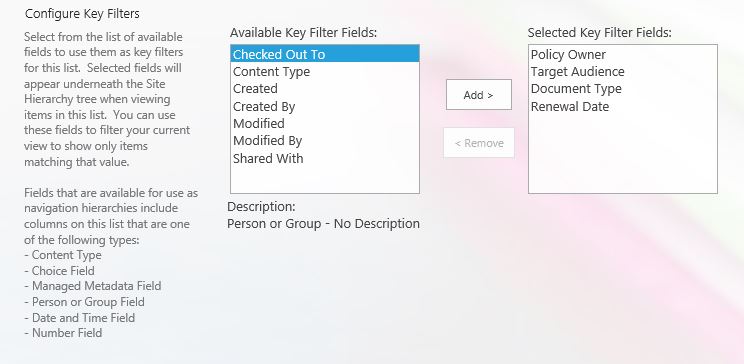
  3. On the next screen you can configure your filters. You have full control over which filters to display and in which order. The filter list on the left side contains all of metadata filters available to you (both out of the box + custom metadata you created yourself).metadata filters
  4. Click OK
You are done – enjoy your search! Now use can search your library based on a combination of metadata filters. Just choose your choices on the left, click Apply filter and your library will adjust results accordingly.