Microsoft’s new PowerApps just came out this week! PowerApps is an
app for Windows 8 and up desktops, or mobile devices. It is also only
for Office 365 customers. When you go to
http://www.powerapps.com, you can request an invite, so that your Office 365 tenant will be allowed to use it. Here is the link to install it
http://aka.ms/powerappsinstall This is a preview of the product, so things in these screenshots may change over time before the final release.
There are several links on the homepage to get you started, such as
Plans and Resources. Also, as you’re trying out PowerApps, there is a
little smiley icon at the top right. That’s where you give your
feedback. Please let them know what you thing, and constructive
criticism letting them know specifically what you are referring to.
Once you get logged in for the first time, the web page will look
like this. You can immediately start making an app or a logic flow:

(To get back to PowerApps, it will also be available here):
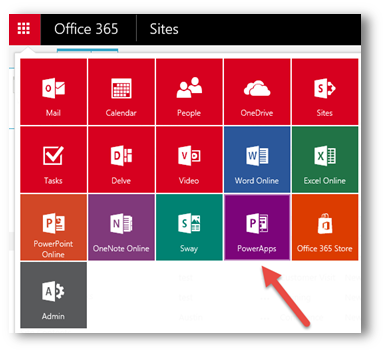
You may assume that you’d need an app before creating a logic flow.
Not really. Logic flows can be based off of a lot of different types of
data sources that you may have access to, such as Salesforce or Azure. I
love the web page ifttt.com, which lets me automate a lot of things in
my life. Well, this is similar, except more for business data sources.
In this example, I’ll start making a SharePoint app based on a couple of lists.
Under “Make an app”, when you click
Get Started, it
shows you a lot of example apps to try out. I highly recommend creating
one or two of these, even if they don’t have the data source you need,
just to try them out and see how all of the controls work, and how they
are set up. Notice at the top, that you can flip between a Phone or a
Tablet, and the app templates will look different for each.
Phone:
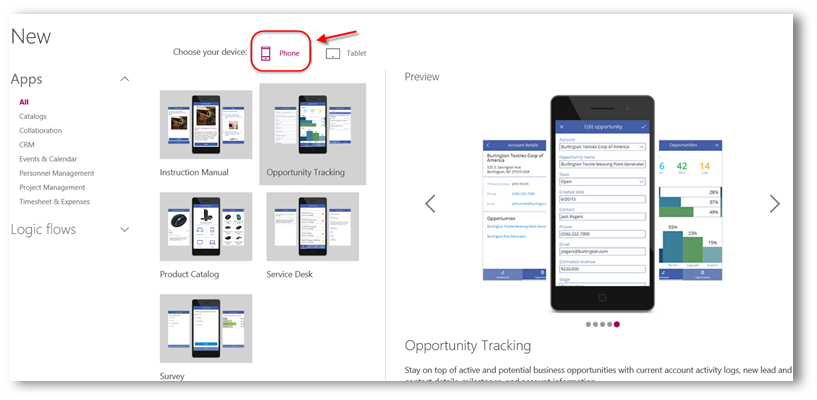
Tablet:

When you click the Choose button at the bottom right, it opens up PowerApps on your computer, or prompts you to install it.
For the sample data in the examples, for now it only lets you choose
between Dropbox, OneDrive or Google Drive. As you can see, I selected
Dropbox.

In PowerApps, click
Connections on the right side,
so that you can create one or more connections to your data. You’ll
notice in the pricing plans that the number and type of connections will
be different in different plans. For example, the enterprise level will
even let you connect to on-premises data sources. As of now, the
available connections you can create are:
- Dropbox
- Dynamics CRM Online
- Google Drive
- Microsoft Translator
- Office 365 Outlook
- Office 365 Users
- OneDrive
- Salesforce
- SharePoint Online
- Twitter
You can just create some connections, which you will potentially use
in various apps you create. You don’t have to use every data connection
in every app, but PowerApps will remember all of your connections and
they will stay in there for next time you fire it up to create another
app. I’m not going to create the sample app right now, I’m going to do a
SharePoint Online one, so I went ahead and added a connection and
authenticated to my Office 365 tenant. Here is their set of steps for creating connections.
- For my SharePoint app, on the main screen I’m going to choose Start from your data, as a phone app:

- I choose SharePoint Online from my list of connections, then on the right, I can add my SharePoint site using New Site. I can have multiple sites in this list.

- I selected my travel site, which doesn’t have that many lists in it.
Once you select a site and click Connect, you will be prompted to
select a list. Don’t worry, even though you’re only selecting one here,
you’ll be able to add more to your app. Select a list and click Connect.
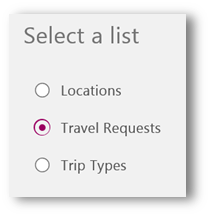
- Your app is built. Pretty basic and needs some tweaking, but it totally works!

Let’s walk around and see what’s what. Here’s Microsoft’s set of
instructions, and you can scroll down to the Customize the app section.
https://powerapps.microsoft.com/en-us/tutorials/get-started-create-from-data/
Getting in and Out
First of all, if you create this app and then exit PowerApps and come
back, you’ll see list of all of your apps that you can open. Like me,
you may click the name of the app to open it to design it some more.
BUT, when you click the name of the app, that is the end user experience
of interacting with it, filling out forms, etc.
Design: You need to click the little “Edit” icon (pencil) to get back to the designer.
Sharing: That’s how you “Publish” it (for now), you share it with people using their email addresses.
Pin: Pin this PowerApp to your Start screen. For people who use it,
fill out forms, etc on a daily basis, this is what they would do.
Currently there is no out-of-box direct link from your SharePoint site
to your app.

Screens
The concept of Screens in here is similar to Views in InfoPath or
Forms in MS Access. Same set of data, just different ways of looking at
it or interacting with it. The default screens are down the left, and
there are three. Notice in the ribbon in the screenshot above, you can
create new screens, rename existing ones, and even select from pretty
layouts for them.
BrowseScreen1 – This is the screen that shows you a list of stuff. Each item has a button to go to the detail page.
DetailScreen1 – This is like the DisplayForm in SharePoint. It’s for looking at data, like a list item.
EditScreen1 – This is used for new items being filled out OR for existing items being edited.
Just like with views in InfoPath, you can create buttons that will
let you switch between views. For example, by default when you create a
new item in here, it takes the user to the DetailScreen to view the item
they just created. You can even click the little ellipses button next
to any screen to do additional actions such as delete it or duplicate
it.
Quick Tools
Notice the pane on the right in my screenshot above. If you don’t see
it, click the Quick Tools button at the bottom of the screen. I love
the way that you can quickly change the layout on your screens, pick
from some color themes, or pick from your content fields. Layouts and
themes are pretty self-explanatory, but what’s “Content” for?
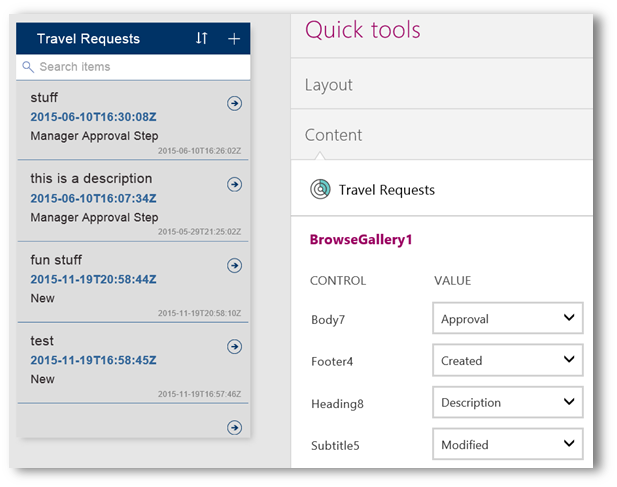
I can tell by looking at the data that those aren’t the fields that
I’d like to display here. For example, the one that says “stuff” is
actually in the description of a travel request. I see on the right that
Heading8 is bound to the description. To change it, I just change the
drop-down box to
Title. You’ll notice when you click
one of those drop-downs for the values, that you see the system name for
each field, not the pretty display name.
(Note: In list settings in the browser, look at the hyperlink of a SharePoint list column name to see
Field= to find out what that column’s system name is)
I went ahead and switched some of mine around, so that the fields that I want are showing, instead of the defaults.

Options
There is an Options button at the bottom, next to the Quick Tools
button. This has my data sources in it, and I can insert more data. For
example, I’d like to have multiple SharePoint lists in this app, for
lookups and such.

Adding more data sources
I’m not sure what the TextualGallerySample is, but there’s my Travel Requests list.
- Click Insert your data to add more sources, such as other SharePoint lists, Twitter, OneDrive, Azure, whatever I need.
- Click SharePoint Online.
- Click the name of your site, or you can even add other sites in here, so you can have cross-site data!

- Click the name of one or more lists, and click the Insert button.
Controls
There are many really cool, modern types of controls that you can use
in PowerApps. Here’s a page where they walk you through adding and
setting up several. https://powerapps.microsoft.com/en-us/tutorials/add-list-box-drop-down-list-radio-button/
Data Cards – These are little sections in your form.
Click on your default EditScreen1, and click on a control. The card I
selected here is for the Title field, which I call the “Destination” in
my travel request list. It contains the label and the text box for the
destination.

When I open up
Quick Tools again while this control
is selected, it looks a little different. There’s more that I can do.
Notice the little Edit column on the far right. See that my estimated
cost field has a number icon, that’s because it’s a number field and the
rest are text. I’d like my trip start and trip end fields to be date
pickers instead of textboxes. This is what you will see when you click
the little
abc icon:

Advanced Settings
Also, notice that when you’re working in controls, there is a
drop-down box and function button at the top of the screen. This can be
used with screens, controls, buttons, etc, and this is where all of the
logic happens. Also, there is an advanced view of properties.
On the
View tab in the ribbon, click
Advanced.
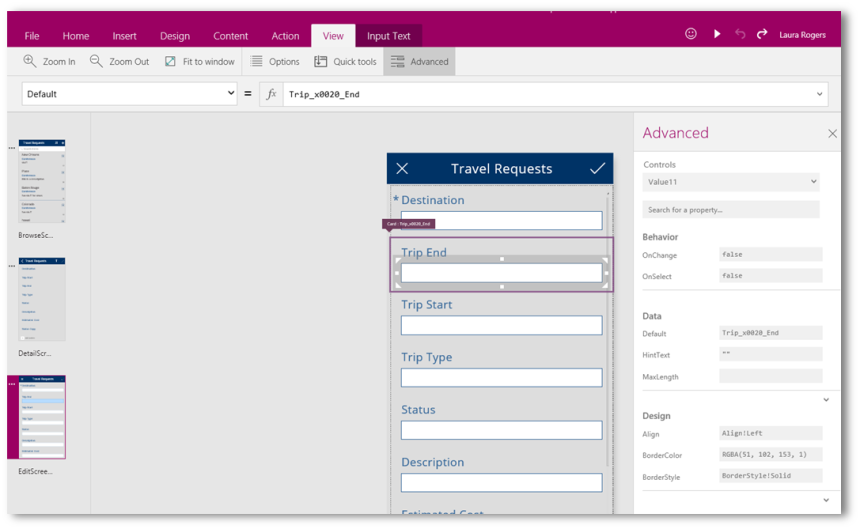
This is where it gets to be more like a programmer’s tool, but a
power user can still make their way around a bit. I can click the
dropdown at the top that says
Default, and each of the
properties that have values will show in bold. Then, I can use the fx
(function) button to do more advanced functions. Notice in the
Advanced pane on the right, a lot of the properties are listed there. See that I have my Trip End control selected, and the
Default
property says Trip_x0020_End, and you can also see the property and
some others on the right. You’ll notice that when you let PowerApps
generate your app for you from your data, and when you use any of the
default templates, a lot of that logic is already there. For example,
when I click the little checkbox (submit) button control, I can see that
the OnSelect has a long string as the function:
If(editGallery1!Valid, UpdateContext({EditRecord1: Patch(‘Travel
Requests’, EditRecord1, editGallery1!Updates)});
If(IsEmpty(Errors(‘Travel Requests’, EditRecord1)),
Navigate(DetailScreen1, ScreenTransition!None, {BrowseRecord1:
EditRecord1})))
As you start filling in or typing a function, it does prompt you and
help you out as you go, letting you know what it’s expecting, to an
extent. Here’s their formula reference: https://powerapps.microsoft.com/en-us/tutorials/formula-reference/
Using the App
At any time, you can use the Share button that I mentioned at the
beginning of this post, to share and let other people use this app.
There are even iPad and Android apps that they can use!
Well that’s all for now. This was just a preliminary run-through to get you started and familiarized with some of this.